Node.js is a unique tool that allows you to perform exciting JavaScript functions on your computer. Just like choosing different tools from your toolbox, there may be times that you have to switch between Node. js versions. In this case you will need the NVM.
NVM stands for Node Version Manager. It’s a tool that lets developers easily manage and switch between different versions of Node. js on their computer. This guide will walk you through the process of changing Node. js versions in simple steps.

Why is NVM important for developers?
Different projects demand specific Node. js versions for compatibility, testing, or smooth operation. Enter NVM, a game-changer that grants developers the power to manage multiple versions effortlessly, ensuring seamless adaptation to any project’s environment.
Why is NVM important for companies?
- When it is not utilized, developers may be required to manually handle Node. js versions, consuming a substantial amount of time. NVM streamlines this process, enabling developers to concentrate on coding tasks.
- Employing an incorrect Node. js version for a project can result in unexpected behavior or errors. NVM helps alleviate this risk by simplifying the matching of Node. js versions with project requirements.
- NVM streamlines onboarding for businesses juggling multiple Node. js projects. It eliminates the friction of configuring local development environments by allowing new developers to seamlessly match project-specific Node. js versions. This translates to faster ramp-up times and smoother integration.
The efficiencies and risk reduction enabled with NVM can result in cost savings.
A Guide to Changing Node Version
Diverse Node. js versions can create a complex environment where each project has its specific requirements. NVM provides precise control over Node. js installations, allowing segregation of project dependencies and smooth transitions between versions. This ensures compatibility across various environments, optimizing workflows, and preventing version clashes, thereby maintaining a streamlined and predictable development process.
Example:
You’re working on a project that uses Library A. This project is currently using version 1.0 of Library A. Then, you decide to use another library — Library B. It also depends on Library A, but requires version 2.0.
Your project needs version 1.0 for its original functionality, but it also needs version 2.0 to be able to use Library B. This is a classic example of a version conflict in development environments.
Tools like NVM (for Node. js) help manage version conflicts by allowing different versions of the same library to coexist in different projects or even in different parts of the same project. This way, Library A v1.0 can be used where it’s needed, and Library A v2.0 can be used elsewhere, resolving the conflict.
NVM is more than just a package manager; it’s a versatile toolset for the Node. js landscape. It expertly manages project dependencies. NVM enables you to effortlessly interchange versions, promoting adaptability and compatibility within a unified workspace. This eradicates the necessity for multiple system-wide installations, maintaining a tidy and productive development environment.
In contrast to conventional installers, NVM serves as an independent tool. It doesn’t necessitate a prior Node. js installation, operating universally to cater to all your requirements of the project. Although NVM doesn’t package Node. js itself, it offers a robust command-line interface.
NVM is not merely a tool for managing Node. js versions; it’s a platform for establishing segregated environments:
- Each Node. js version is safeguarded for your project’s dependencies.
- It empowers you to construct and administer multiple versions on a singular device.
- It eradicates dependency clashes and maintains a neat and effective development environment.
Setting Up NVM on different operating systems
To set up the Node Version Manager on both Windows and macOS systems, follow these guidelines.
Windows
While NVM doesn’t offer direct support for Windows, there’s a workaround in the form of an equivalent tool known as nvm-windows. This tool provides the same functionality as NVM, making it a suitable option for Windows users.
-
Initiate the process by downloading the nvm-setup.zip file from the official nvm-windows repository
-
Proceed by extracting the contents of the downloaded package and executing the nvm-setup.exe file
-
Navigate through the installation guide, adhering to the instructions provided at each stage
-
Launch either PowerShell or Command Prompt. Validate the installation by typing nvm -v and hitting enter. The version number of NVM should be displayed, confirming the successful installation
MacOS
Before you commence, ensure that Homebrew is installed on your MacOS. If it isn’t, the initial step is to download and install Homebrew.
-
Setting up NVM
-
Downloading and installing the necessary NVM files
-
Create a dedicated folder for NVM. This folder will house all the NVM-related files and data
-
Set up the necessary environment variables
-
Activate these variables in the current shell environment. This ensures that the shell recognizes the variables and can use them when running NVM
Linux
For NVM installation on Linux, users can choose between curl and wget, both efficient data transfer tools. The choice depends on user preference and installation needs.
Setting the Default Node Version using NVM
NVM integrates with POSIX standard shells like sh, dash, ksh, zsh, and bash. Its universal compatibility extends to diverse operating systems, including Unix, macOS, and the Windows Subsystem for Linux (WSL), making it a versatile tool for efficient version management.
Advice from OrbitSoft:
Please note that NVM is mainly supported on Linux and Mac operating systems. However, Windows users can use a similar tool called nvm-windows, developed by coreybutler. If you are a Windows user without administrator privileges, you can use alternative libraries that allow you to switch between Node versions easily. One such library is jchip/nvm. Before using this alternative, make sure to delete your old nvm installation.
To ensure that your system functions correctly, you must specify the version of Node. js you are using. To set a particular version as the default using NVM, follow these instructions:
-
To install your required version, use the 'nvm install [version number]' prompt
-
Replace the version number with the required version
-
To set the installation version as the default, run 'nvm alias default [version number]'
Customizing your Node. JS environment ensures that it meets your specific requirements, increasing the efficiency and compatibility of your engineering efforts.
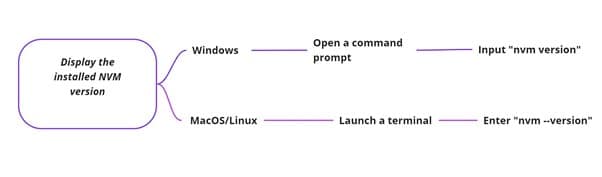
To check the current version of Node. JS, run this command:
-
nvm use 16
-
Now using node v16.9.1 (npm v7.21.1)
-
node -v
-
v16.9.1
If you find this version insufficient, the 'nvm use default' command allows you to easily revert to the default version. This gives you the flexibility to ensure that your preferences are always prioritized.Purpose of aliases in NVM
In Node. js version management (NVM), aliases provide a convenient way to refer to specific versions with a custom name. The NVM alias command empowers you to streamline this process, enabling easy creation and management of these shortcuts. Executing this command kicks off the alias creation:
nvm alias default
NVM aliases act as a mnemonic layer for Node. js versions. This functionality lets you map specific versions to custom, memorable names. This streamlines switching between projects with varying Node. js requirements. You ditch the need to recall and type exact version numbers every time, improving workflow efficiency.
Advice from OrbitSoft:
To create an alias named 'project1' through the command, if you frequently work with Node. js version 14.15.1:
nvm alias project1 14.15.1
After configuring this alias, switching to version 14.15.1 is as easy as typing:
nvm use project1
This feature simplifies the management of versions, saving time and effort, and improving productivity.
List of Installed Node. js Versions
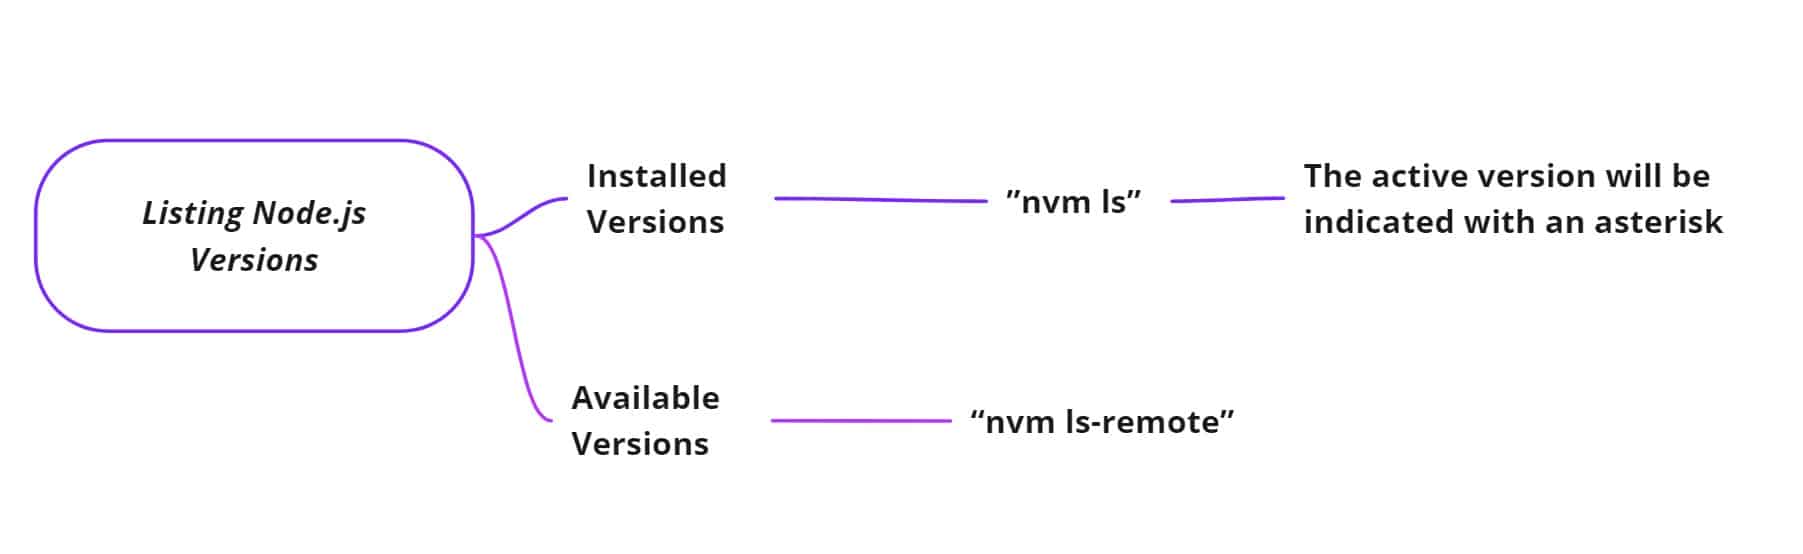
Confirming your Node. js version is a quick and easy task, and it’s vital for a variety of tasks, such as debugging problems, maintaining compatibility with dependencies, and investigating new functions. There are two main methods:
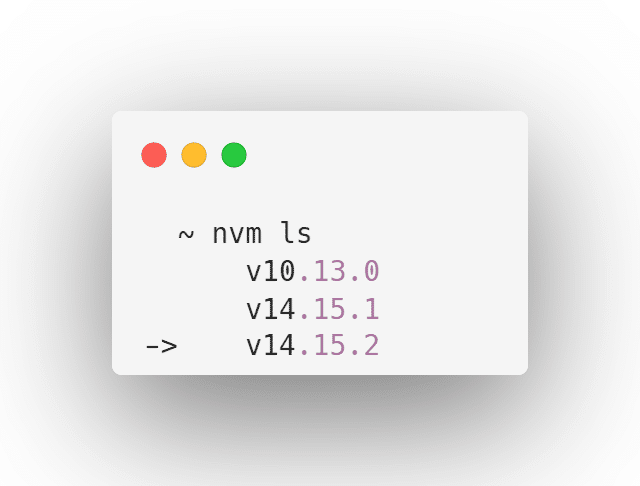
You can find out the list of existing Node builds installed as the default version by using:
nvm ls
The list displays all installed versions of Node. js, with the currently active default Node version marked with a → symbol in front of its number.
How to Update Node. js Version
Node.js versions can be updated depending on individual requirements and project goals. Here we’ll break down a few of the most commonly used methods.
NPM
NPM acts as an installation gateway for n, a product for controlling versions of Node.js. But n is not just limited to control — it is also able to optimize. There are variants: the latest stable release, an advanced release with an unstable variant, or a specific release.
1. Clear the cache.
2. Make n globally available
3. Select the right version of Node.js.
NVM
Node Version Manager is a command-line tool designed to enable developers to seamlessly manage multiple versions of Node. js on a single device. By assigning distinct Node. js versions to individual projects, NVM effectively eradicates version conflicts, streamlining project workflows. Prior to utilizing NVM, installation is essential for seamless operation.
Official Website
Users can access the latest Long-Term Support (LTS) Node. js binaries from the official website, easing NPM upgrades. To deploy, download and run an installer for the desired Node. js version and OS.
Setting the Default Node. js Version Without NVM
This guide details the efficient installation of Node. js and its accompanying package manager, npm, on Linux systems. Leveraging your system’s native package manager (e.g., apt, yum) streamlines the process by providing pre-built binaries for Node. js within its repositories. This ensures a quick and hassle-free installation, typically setting up the most popular version by default.
To acquire the most recent versions of Node. js, initiate an update of your package repository. For systems utilizing apt, execute the command sudo apt update. This refreshes the list of available packages, ensuring access to the latest releases.
Now, to install Node. js and set a default instance on your system, run the command sudo apt install nodejs within your terminal.
Verifying the Default Node. js Version
For installing a new version, employ «nvm install» or «nvm install node» for the latest version. To install the latest Long Term Support (LTS) version, execute «nvm install --lts».
Tips for using NVM
- Use nvm alias command to create shortcuts for different versions of Node.js. This practice can increase efficiency and reduce the chance of errors.
- Employ NVM to assess your applications with various versions to verify compatibility and stability.
- Before installing NVM, it is advisable to uninstall any existing Node. js to prevent potential conflicts.
- Keeping NVM up-to-date is essential to access the latest features and improvements, ensuring you are always with the latest updates.
Benefits of NVM
Why need to utilize NVM?
- Streamlines the installation and removal of versions across various projects, reducing reliance solely on npm.
- Facilitates customized environments tailored to each distinct project.
- Simplifies the intricacies of handling different Node. js versions, providing a more straightforward approach to version control.
At OrbitSoft, we understand the complexities of managing multiple Node. js versions. That’s why we recommend using NVM, a tool that streamlines the installation and removal of versions across various projects, facilitates customized Node environments tailored to each distinct project, and simplifies the intricacies of handling different Node. js versions.
Remember, the key to utilizing NVM effectively is to continuously seek methods to streamline your workflow. For more information, reach out to us at OrbitSoft.
FAQs
How do I set NVM as default?
NVM doesn’t directly set a default Node. js version for the entire system. Instead, it allows you to specify a default version that NVM will use for new terminals. You can set this with the nvm alias default <version_number> command.
How to change the default npm version?
NVM doesn’t directly change the default npm version. However, specifying a default Node. js version with nvm alias default <version_number> will also set the npm version associated with that Node. js version as the default for that terminal session.
What is the default install directory for nvm?
The default installation directory for Node Version Manager is typically in the user’s home directory, specifically in a subdirectory named «.nvm». This directory houses the Node. js versions and related files managed by NVM.
How do I change my Node version using nvm?
To change your Node. js version using NVM, you can refer to our comprehensive guide in the article. The guide provides step-by-step instructions to help you seamlessly manage and switch between different Node. js versions using NVM.